Showing posts with label Tutorial. Show all posts

Tuesday, January 23, 2018

Christmas Craft Concepts: Holiday Card Stash Box Ideas

We're shaking things up at the 12 Months of Christmas. While we have offered countless recipes and unearthed customs and traditions from around the world, it's time to explore a different path. Each month this year, we will offer up a tutorial or template revolving around the holidays.

WHERE DO YOU STASH YOUR CHRISTMAS CARDS THROUGHOUT THE YEAR?

The problem with accumulating a stack of handmade cards is where to keep them. You can't stack them or they'll topple; stuffing them in a drawer seems a little haphazard. I personally like to use photo boxes, but as you can see, I need to decorate it in some way to keep the box of holiday cards from getting lost with the other boxes. This is only half the room, with more boxes not pictured.
I tried to use sticky notes, but they kept falling off; I didn't want to permanently mark up the boxes, since I use up their contents and switch out what goes in them.
But I always have an ever-growing stash of Christmas cards, so I gather up my supplies: empty photo box, patterned paper, paper cutter, spray adhesive, a well-ventilated, protected area to work in (mine is my stove top, cleverly concealed by newspaper store ads, where I have a venting fan that will suck up the fumes from the adhesive).

I start by measuring out the sides of my box. I want a clean look to it, so I'll make the smaller front and back ends longer than necessary so I can fold them over. Then I can cover them up with the papers I adhere to the long sides of my box.

Spray the adhesive on the backs of your papers, waiting about 15 seconds for it to get tacky, and apply to your box, starting with the front and back ends.
Next, measure and cut your papers for the lid, remembering to make the papers for the front and back sides longer.
When all sides of your box and lid are papered, you can decorate to your heart's content. I like to just place a large decoration that I can read from afar, one that tells me that Christmas cards are inside.
As you can see, I've got a good start on my stash for 2018. Not bad for just 23 days!


There are lots of ways to store your cards for the holidays. At Household management101, they suggest buying a greeting card holder from Amazon. It looks great, but at over $17, it's not quite in my budget.
It looks very much like the photo storage boxes you can buy at Michael's or Hobby Lobby. I have three of those. I would have to make my own tabs to separate my cards (children's, religious, family, etc).Photo boxes, on the other hand, can cost as low as $1.50 US dollars.


Next, I found a template that looks like a magazine holder but is sized for note cards. The template is offered by Papertrey ink and is sold for $5. It's still a little pricey, but at least you can create it yourself, putting personal touches in your project and even using it as a gift filled with cards (or blank cards and embellishments)for friends.
Then I got to thinking. Anyone can take a cereal box or some kind of box and cut it to look like a magazine holder. Except, of course, it should be sized to hold cards. Recycle and upcycle is my motto, and all it costs is a few weeks of eating the same cereal for breakfast to empty the box, your craft papers and embellishments!

There are so many ways to store your cards, but I have one more way that will KNOCK YOUR SOCKS OFF. Granted, you may not build your stash this much, but don't you just turn green with envy at her storage system?? I know I'm salivating over it...
Amanda of Wit & Whistle sells cards and other paper goodies and needs storage for her inventory. These are bookcases from Ikea.

So as you can see, there are a number of different methods for keeping your stash of Christmas cards together. Some home-made and some purchased. Whatever system you choose, just make sure that it will serve you best and keep all those Christmas cards looking as neat and fresh as the day you first made them!

Thanks for joining us today. I hope that I have given you some great ideas to play around with. Be sure to join me again on February 23rd when I will be back to share a new Christmas Craft Concept!


Monday, September 14, 2015

Tutorial: Quilting background affect


I had some time this weekend to try out a new technique that I saw on You Tube! It was actually performed on a canvas, but of course as a crafter, I modified it to meet my needs. 

I really liked this technique because now I have use for all my little scraps of paper. I will just put them in a baggy and they will be ready when I am ready. Let me show you what I did.

  • Tear up between 10 - 15 pieces of paper (depending on size)
  • Rip all 4 sides of each paper
  • Distress all 4 sides using Walnut Stain Distressing ink
  • Glue down each piece overlapping to cover 4.25" x 5.5" card stock
  • Using your finger, spread Gel Medium (found with Gesso products)
  • Cut edges with Fancy scissors and distress sides using Walnut Stain
  • Using walnut stain distressing ink, stencil an ATC 3.5" x 2.5"
  • Distress sides of card 
  • Adhere tim holtz washi tissue and Harlequin tape
  • Stamp ATC with Coffee Christmas Tree using StazOn Midi - Cactus Green
  • Stamp Postale image using StazOn Midi - Ganache
  • adhere Christmas Vintage Christmas Tickets from VectoriaDesigns
  • Tie twine around bottom of card
  • Add Star to top of tree
  • Adhere to Base of white cardstock
Now it seams like a lot of steps, but it really is not. Most of the time will come from tearing up the paper and distressing the sides, but if you do this along the way, and save your scraps, you will find that you can put a card like this together in no time. 

The Gel Medium really brings out the distressed ink and makes the background look line a continuous pattern, so don't skimp or skip this step. It really does make the card.

Good luck!

For more fun and inspiration you an follow me on FacebookInstagramTwitter & Pinterest.

Friday, July 10, 2015

Tutorial: Holiday Gift Bag

Hi everyone,  It has been a while since I have done a tutorial, so I thought I would share a Christmas gift bag I recently created.  So I am here today to show you how I transformed a plain white gift bag into a Vintage Christmas Gift Bag.  

So lets get started.


I used a striped printable from VectoriaDesigns and added the sentiment Merry Christmas from PicMonkey. I then layered it on top of some paper from Tim Holtz Paper stack 


I then used my Misti to place my Holly Snowflake Swirl Stamp exctly where I wanted it on my paper. I used my paper distresser along with Walnut Stain (one of my staples) to to make the edges look more vintage.

I added a sticker swirly to the bottom and adhered the finished piece onto the white gift bag.  Now a bit of advice, when you are adhering to the gift bag, make sure you use some strong adhesive, because once you start filling up this back, the paper may pop off. I tell you this from experience.  A hot glue gun worked great to make sure the paper stayed in place.


I also added a fun matching gift tag. 


I have this great tool called Crop A Dile that I use on all my tags. Work Great!


These bags were super easy to make and will house lots of fun Christmas Goodies this holiday Season. So don't go out and buy gift bags this year, make them. People will be ooing and aaahing!

Thanks for stopping by.


Items I used:


Thursday, February 12, 2015

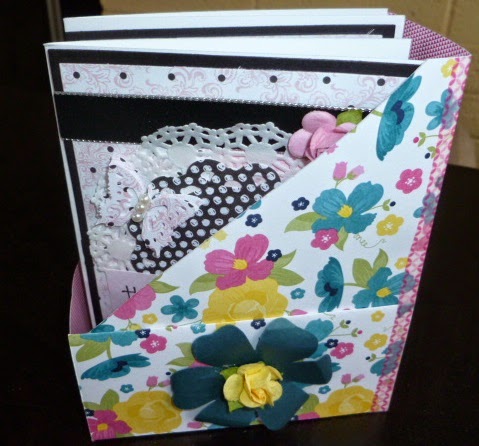
Mini Magazine Holder AKA A2 Card Holder

Hi everyone. Monica here and I am back with another fun tutorial. I thought since we are going to be making at least two Christmas Cards a month, it would be fun to have a little Mini Magazine Holder, AKA an A2 Card Holder.


If you are anything like me, I sometimes have several cards just sitting on my desk waiting for me to post. I don't like to put them away until I post about them, so I usually leave them on my desk, which is cluttered enough as it is. This little card holder solves my problem and it is very easy to make as well.

So here we go:

Cutting:

1.  Start with a 12" x 12" piece of cardstock
2.  Cut it down to 12" x 11"
3.  Band: 12" x 2" & 2" x 2"

Scoring:

1. Score 11" side at 4.5" and 6.5"
2. Score 12" side at 5.5" and 10"
  
More cutting:

1. Cut both sides on the score lines up to the 2" score line in the middle.
2.  Fold both sides on the middle piece up to the 2" score line in the middle. 
3.  Place a pencil mark at top 1/2 " from the score line and at bottom at 2" 
4.  Draw line with pencil and place in trimmer and cut these pieces off


Taping:

1. Fold and tape 2" band on both sides to the outside of the top piece placing the top piece on the inside. 
2. Fold up and tape side panels
3. Tape 2" x 12"  band around the bottom starting from the back and wrapping around the front. 
4. Tape 2" x 2" square on the backside of the holder


Decorate:

1. Decorate as desired


I made a couple of these cute little card holders. One I put the band on and one I did not, but I think they both came out pretty cute. Now you have a place to put those finished Christmas cards that you link up every month!

Thanks for stopping by.


Friday, November 28, 2014

Santa Passport Card

Well, it is the Day after Thanksgiving, the official kick off for the Christmas Season. So in honor of that I am sharing with you our first tutorial.

 A few months ago I created a passport card on my own blog over at Taylormadecards4u. I had promised that I would come back and add the tutorial. I have linked the original post above. For this card, I modified the theme to create a Passport in honor of Santa's upcoming travels. 

Santa Passport Card


The base card is exactly the same. It is two pieces of craft card stock measuring 
7" x 5.5" and 5 3/4" x 4.5". I scored the larger piece at 3" and again at 1 3/4" up to the first scored line. You will need to cut off this rectangular piece so that your card has all the layers showing.


I then scored the smaller card stock at 2". I adhered the 4.5" x 2" flap to the inside of the larger piece.
This created the base of the card. I covered the base card with vintage looking paper before putting the pieces together. It made covering the card a lot easier along with the rounding of the corners.

Once the base was covered with my designer paper, I adhered the 4.5" x 2" flap to the inside of the larger piece completing the structure of the card.

Before decorating it, I distressed it using Distress ink - Walnut Stain.


From there I just started decorating. I downloaded the image from http://janetkdesignfreedigitalvintagestuff.blogspot.nl/.  Unfortunately, she has since closed down her blog. But any head shot of Santa will work , you just want it to look like a passport photo.  I  then added "The Journey" using a remnant rub on.


From there I just started decorating. I downloaded the image from http://janetkdesignfreedigitalvintagestuff.blogspot.nl/.  Unfortunately, she has since closed down her blog. But any head shot of Santa will work , you just want it to look like a passport photo.  I  then added "The Journey" using a remnant rub on.


On the last flap, I created a pocket to hold Santa's Documents. This set is from 7 Gypsies and is called Tags Assortment. 


I finished it off by adding a few more stamped images and some embellishments. 
The overall project was very easy, it was finding the right decorations to make it truly look like Santa's Passport. 

So now we don't have to worry about Santa's upcoming trip! His documents are all in order and he will be able to visit all of us without worry!

I sure hope you enjoyed my first tutorial and hope you give it a try!


Supplies:
  • Remnant Rubs - Life Quotes
  • Fiskars Simple Stick - Calendar & Sentiment
  • Hampton Art - Par Avion rubber stamp
  • Just Rite Cling - Christmas Trimmings
  • Idea-ology - Hinge Clip
  • Idea-ology - Swivel Clasp
  • Idea-ology - Philosphy Tags
  • 7 Gypsies- Tags Assortment
  • Distress Ink - Walnut Stain
  • Blending Tool
  • Vintage looking Designer paper